| 百度智能云全功能AI开发平台BML-基于Notebook的图像分类模板使用指南 |
|
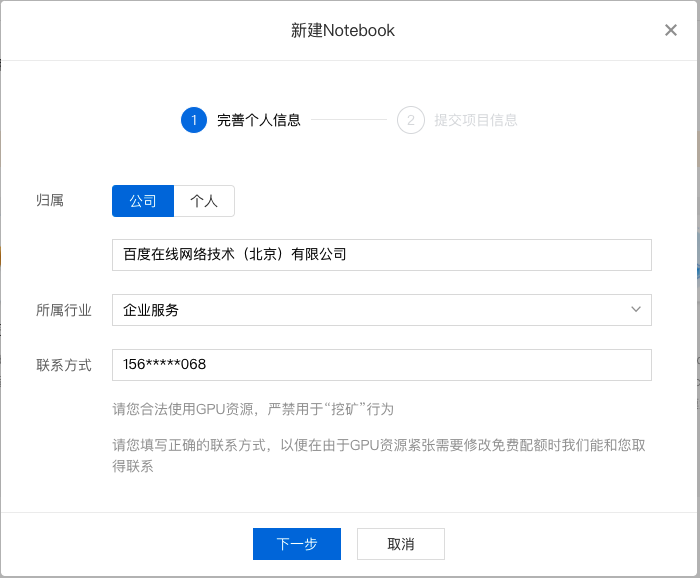
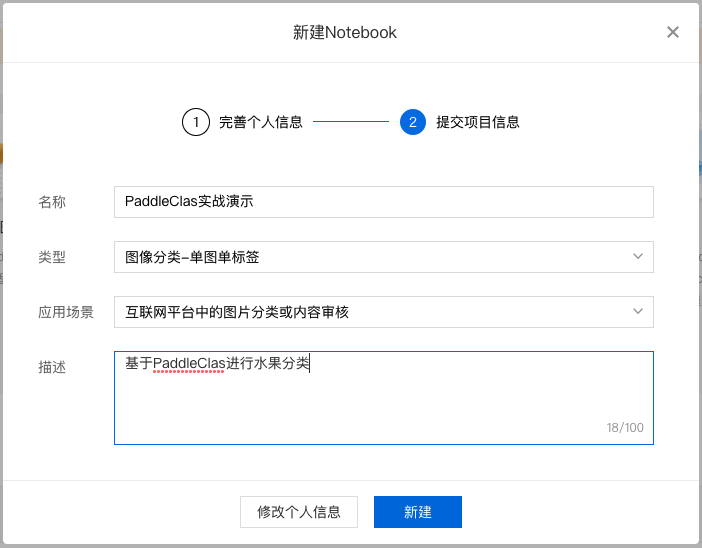
百度智能云全功能AI开发平台BML-基于Notebook的图像分类模板使用指南 基于Notebook的图像分类模板使用指南本文采用图像分类-单图单标签模板开发模型的过程为例,介绍从创建 Notebook 任务到引入数据、训练模型,再到保存模型、部署模型的全流程。 创建并启动Notebook1、在 BML 左侧导航栏中点击『Notebook』 2、在 Notebook 页面点击『新建』,在弹出框中填写公司/个人信息以及项目信息,示例如下: 填写基础信息
填写项目信息
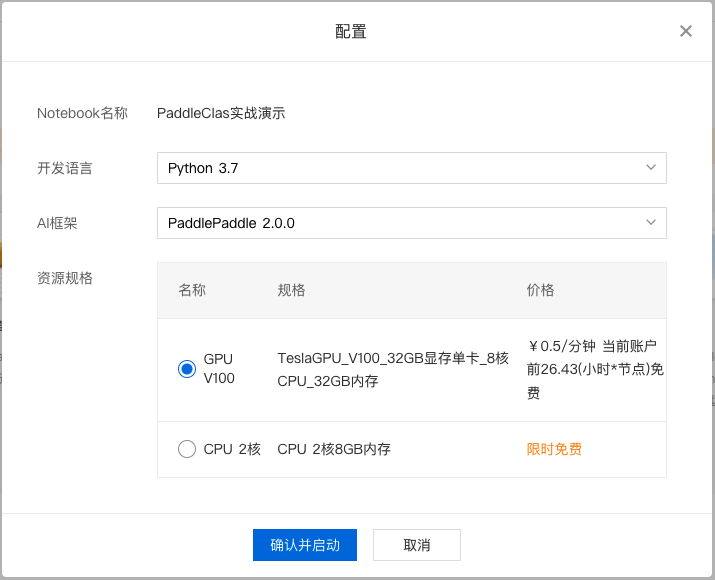
3、对 Notebook 任务操作入口中点击『配置』进行资源配置,示例如下: 选择开发语言、AI 框架,由于本次采用 PaddleClas 进行演示,所以需要选择 python3.7、PaddlePaddle2.0.0。选择资源规格,由于深度学习所需的训练资源一般较多,需要选择GPU V100的资源规格。
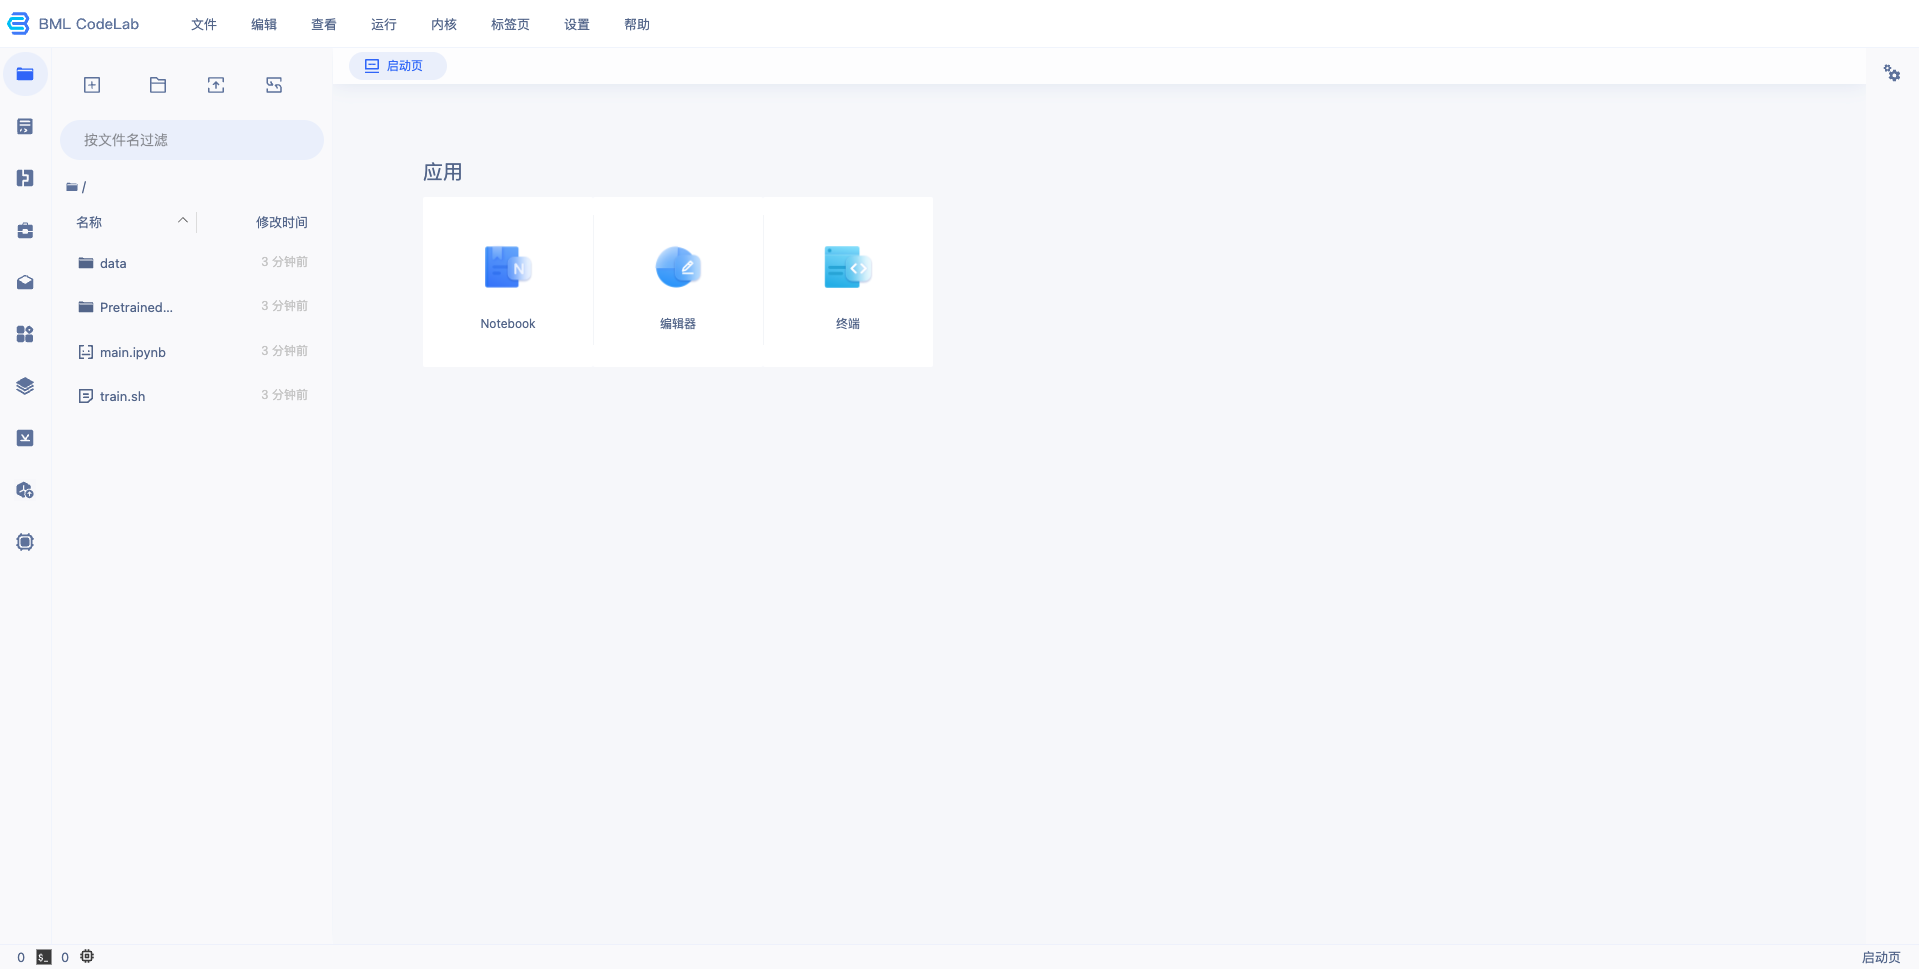
完成配置后点击『确认并启动』,即可启动 Notebook,启动过程中需要完成资源的申请以及实例创建,请耐心等待。 4、等待 Notebook 启动后,点击『打开』,页面跳转到 Notebook,即完成 Notebook 的创建与启动,示例如下:
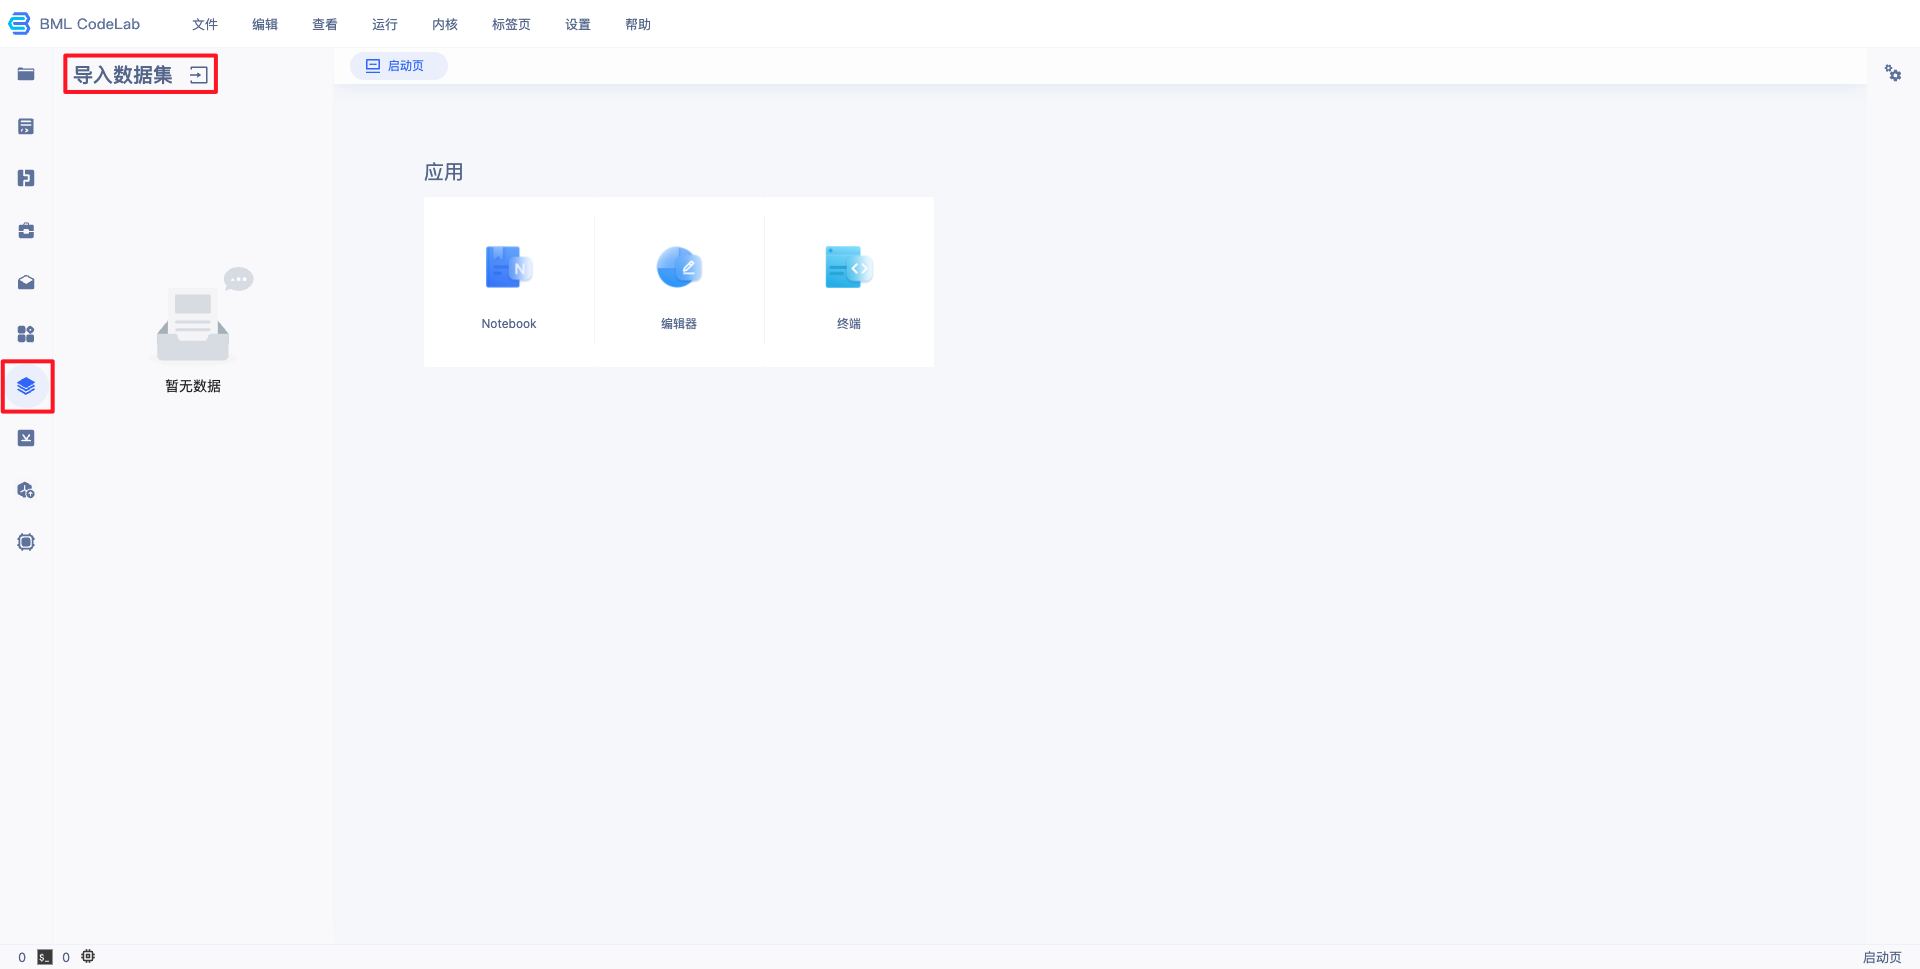
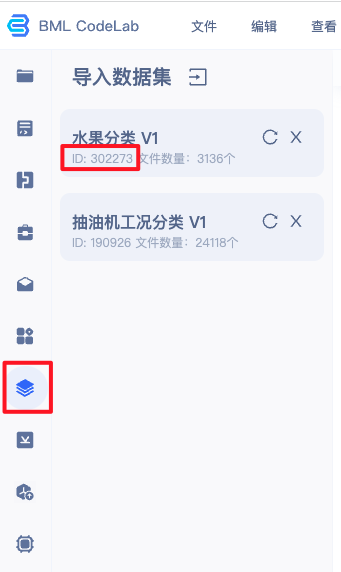
训练图像分类-单图单标签模型下载 PaddleClas 套件打开进入 Notebook,点击进入终端,输入如下命令切换到 cd /home/work/本文以 wget https://github.com/PaddlePaddle/PaddleClas/archive/refs/heads/release/2.3.zip && unzip 2.3.zip安装环境在终端环境中,安装该版本的 python -m pip install paddlepaddle-gpu==2.1.3.post101 -f https://www.paddlepaddle.org.cn/whl/linux/mkl/avx/stable.html安装完成后,使用 如果出现 准备训练数据训练数据是模型生产的重要条件,优质的数据集可以很大程度上的提升模型训练效果,准备数据可以参考链接。本文所用的安全帽检测数据集可前往此链接进行下载:下载链接。 1、导入用户数据。 在 Notebook 中并不能直接访问您在 BML 中创建的数据集,需要通过左边选择栏的导入数据集选项,进行数据集导入。导入的数据位于用户目录的
注:若在BML中未创建数据集,请先参考 数据服务 ,创建、上传、标注数据集。 2、数据转换。
图像相对路径 图像的label_id(数字类别)(注意:中间有空格)转换脚本如下: import osimport jsonimport globimport codecsimport randomdef parse_label_list(src_data_dir, save_dir):
"""
遍历标注文件,获取label_list
:param src_data_dir:
:return:
"""
label_list = []
anno_files = glob.glob(src_data_dir + "*.json")
for anno_f in anno_files:
annos = json.loads(codecs.open(anno_f).read())
for object in annos["labels"]:
label_list.append(object["name"])
label_list = list(set(label_list))
with codecs.open(os.path.join(save_dir, "label_list.txt"), 'w', encoding="utf-8") as f:
for id, label in enumerate(label_list):
f.writelines("%s:%s\n" % (id, label))
return len(label_list), label_listdef trans_split_data(src_data_dir, save_dir):
"""转换数据格式,并3/7分切分数据"""
image_list = glob.glob(src_data_dir + "*.[jJPpBb][PpNnMm]*")
image_label_list = []
for image_file in image_list:
json_file = image_file.split('.')[0]+".json"
if os.path.isfile(json_file):
annos = json.loads(codecs.open(json_file).read())
label = annos["labels"][0]["name"]
image_label_list.append("{} {}\n".format(os.path.basename(image_file), label_list.index(label)))
random.shuffle(image_label_list)
split_nums = int(len(image_label_list) * 0.3)
val_list = image_label_list[:split_nums]
train_list = image_label_list[split_nums:]
with open(os.path.join(save_dir, "train.txt"), 'w') as f:
f.writelines(train_list)
with open(os.path.join(save_dir, "val.txt"), 'w') as f:
f.writelines(val_list)
class_nums, label_list = parse_label_list("/home/work/data/${dataset_id}/", "/home/work/PretrainedModel/")trans_split_data("/home/work/data/${dataset_id}/", "/home/work/PretrainedModel/")将上述脚本存放为
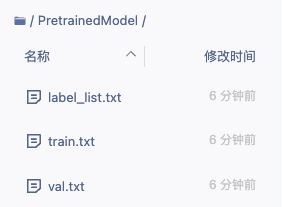
运行代码。 python coversion.py运行之后将在
训练模型1、在终端中打开 cd /path/to/PaddleClas2、修改yaml配置文件。 本文以 ResNet50_vd 为例,配置文件路径为: /home/work/PaddleClas-release-2.3/ppcls/configs/ImageNet/ResNet/ResNet50_vd.yaml# global configsGlobal:
checkpoints: null
pretrained_model: null
output_dir: ./output/ # 使用GPU训练
device: gpu # 每几个轮次保存一次
save_interval: 1
eval_during_train: True
# 每几个轮次验证一次
eval_interval: 1
# 训练轮次
epochs: 10
print_batch_step: 10
use_visualdl: False #是否开启可视化
# used for static mode and model export
# 图像大小
image_shape: [3, 224, 224]
save_inference_dir: ./inference# model architectureArch:
# 采用的网络
name: ResNet50_vd # 类别数
class_num: 1000
# loss function config for traing/eval processLoss:
Train:
- CELoss:
weight: 1.0
epsilon: 0.1
Eval:
- CELoss:
weight: 1.0Optimizer:
name: Momentum momentum: 0.9
lr:
name: Cosine learning_rate: 0.1
regularizer:
name: 'L2'
coeff: 0.00007# data loader for train and evalDataLoader:
Train:
dataset:
name: ImageNetDataset # 数据集根路径
image_root: /home/work/data/${dataset_id}
# 前面生产得到的训练集列表文件路径
cls_label_path: /home/work/PretrainedModel/train_list.txt # 数据预处理
transform_ops:
- DecodeImage:
to_rgb: True
channel_first: False
- RandCropImage:
size: 224
- RandFlipImage:
flip_code: 1
- NormalizeImage:
scale: 1.0/255.0 mean: [0.485, 0.456, 0.406]
std: [0.229, 0.224, 0.225]
order: ''
batch_transform_ops:
- MixupOperator:
alpha: 0.2
sampler:
name: DistributedBatchSampler batch_size: 64
drop_last: False
shuffle: True
loader:
num_workers: 0
use_shared_memory: True
Eval:
dataset:
name: ImageNetDataset # 数据集根路径
image_root: /home/work/data/${dataset_id}
# 前面生产得到的训练集列表文件路径
cls_label_path: /home/work/PretrainedModel/val_list.txt transform_ops:
- DecodeImage:
to_rgb: True
channel_first: False
- ResizeImage:
resize_short: 256
- CropImage:
size: 224
- NormalizeImage:
scale: 1.0/255.0 mean: [0.485, 0.456, 0.406]
std: [0.229, 0.224, 0.225]
order: ''
sampler:
name: DistributedBatchSampler batch_size: 64
drop_last: False
shuffle: False
loader:
num_workers: 0
use_shared_memory: TrueInfer:
infer_imgs: docs/images/whl/demo.jpg batch_size: 10
transforms:
- DecodeImage:
to_rgb: True
channel_first: False
- ResizeImage:
resize_short: 256
- CropImage:
size: 224
- NormalizeImage:
scale: 1.0/255.0 mean: [0.485, 0.456, 0.406]
std: [0.229, 0.224, 0.225]
order: ''
- ToCHWImage:
PostProcess:
# 输出的可能性最高的前topk个
name: Topk topk: 5
# 前面得到标签文件
class_id_map_file: /home/work/PretrainedModel/label_list.txtMetric:
Train:
Eval:
- TopkAcc:
topk: [1, 5]根据相关文件的地址对上述yaml文件进行修订,主要修改点:类别数、训练和验证集的路径、标签文件地址、训练和验证的 注:Notebook 因为是单卡的,需要将 num_workers 改为0,在本地的话则需要根据实际情况进行更改 修改类别数20行:class_num: 5修改训练集的路径(数据集id根据您自己的情况调整)49行:image_root: /home/work/data/30227350行:cls_label_path: /home/work/PretrainedModel/train.txt
修改训练GPU74行:num_workers: 0修改验证集的路径(数据集id根据您自己的情况调整)80行:image_root: /home/work/data/30227381行:cls_label_path: /home/work/PretrainedModel/val.txt
修改验证GPU101行:num_workers: 0修改标签文件地址124行:class_id_map_file: /home/work/PretrainedModel/label_list.txt3、训练模型。 在终端中执行以下命令,开始模型训练。 cd PaddleClas-release-2.3/
python tools/train.py -c ./ppcls/configs/ImageNet/ResNet/ResNet50_vd.yaml4、模型预测。 在终端中执行以下命令,开始模型预测。 python tools/infer.py \
-c ./ppcls/configs/ImageNet/ResNet/ResNet50_vd.yaml \
-o Infer.infer_imgs=/home/work/data/${dataset_id}/xxx.jpg \
-o Global.pretrained_model=output/ResNet50_vd/best_model预测结果如下:
5、导出模型。 在终端中执行以下命令,将最佳模型转为可以用于发布的 inference 模型。 python tools/export_model.py \
-c ./ppcls/configs/ImageNet/ResNet/ResNet50_vd.yaml \
-o Global.pretrained_model=output/ResNet50_vd/best_model \
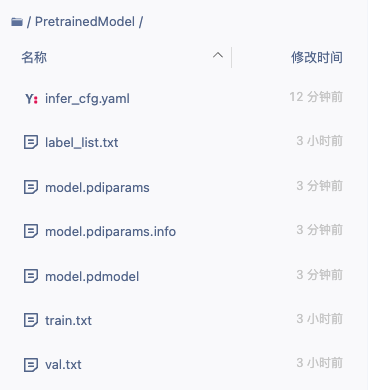
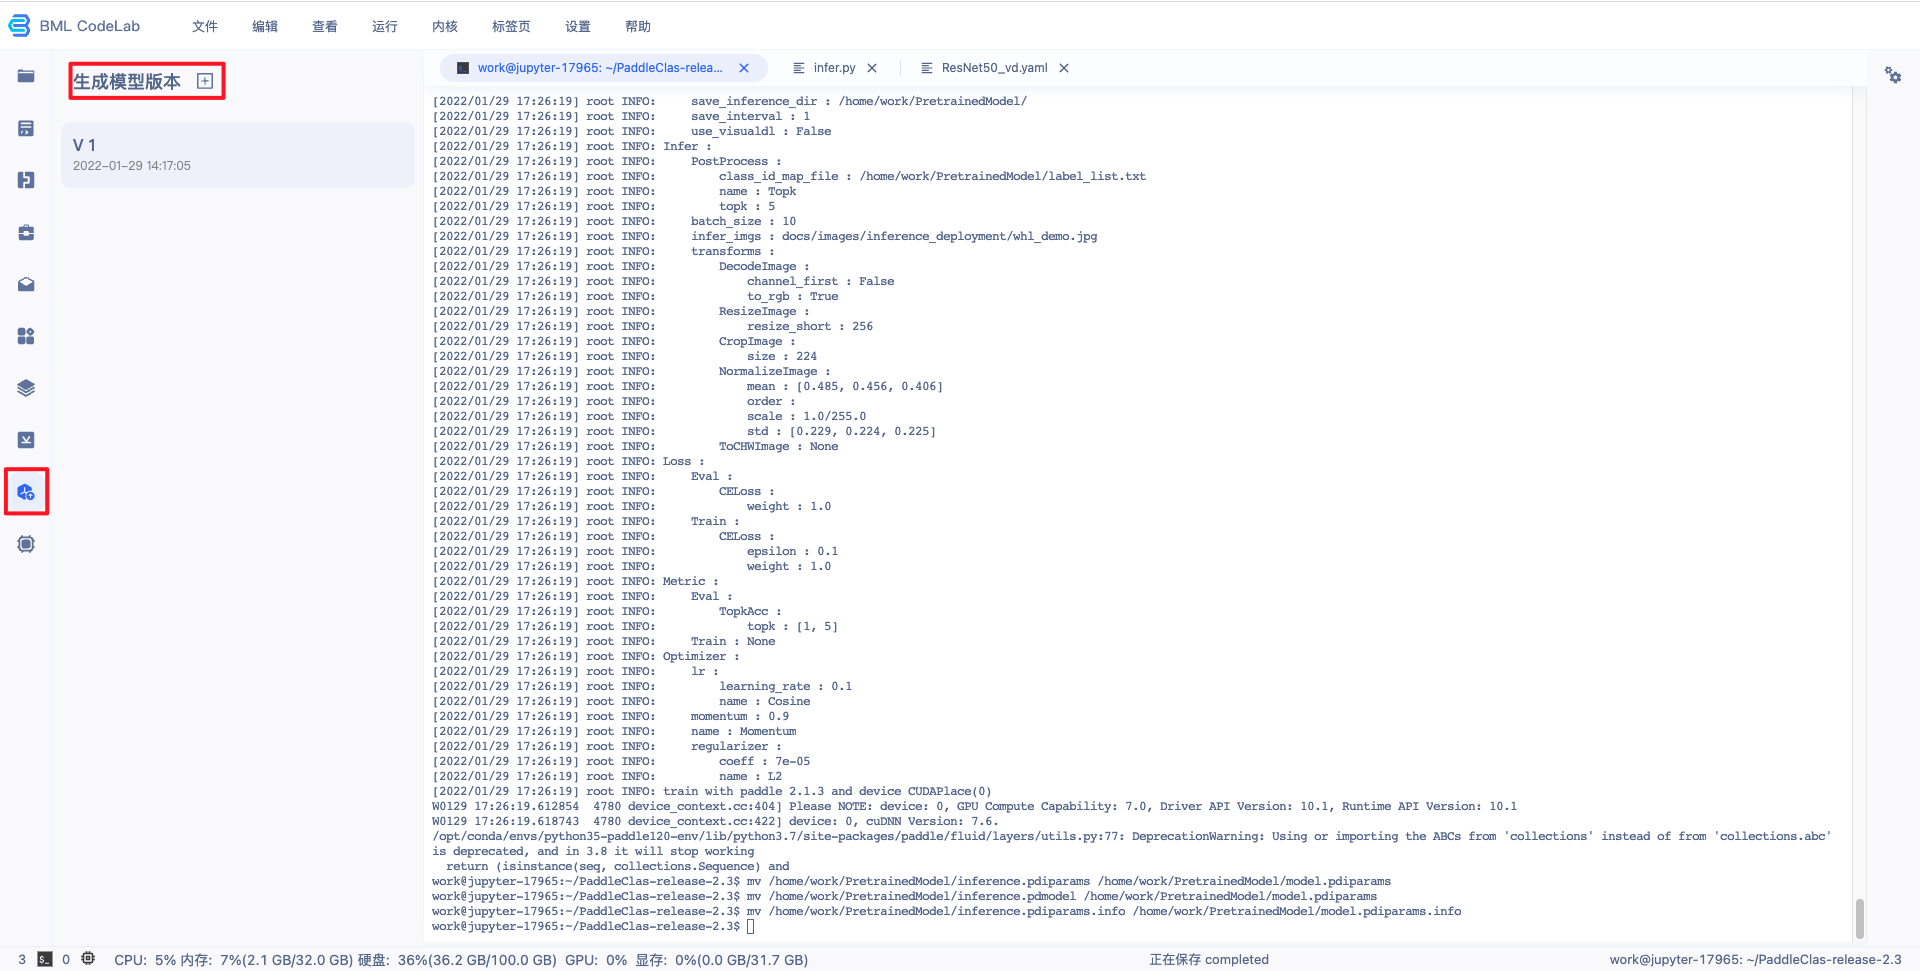
-o Global.save_inference_dir=/home/work/PretrainedModel/在终端中执行以下命令,将导出模型重命名为以“model”为前缀的模型文件。 mv /home/work/PretrainedModel/inference.pdiparams /home/work/PretrainedModel/model.pdiparamsmv /home/work/PretrainedModel/inference.pdmodel /home/work/PretrainedModel/model.pdmodelmv /home/work/PretrainedModel/inference.pdiparams.info /home/work/PretrainedModel/model.pdiparams.info分类模型部署时默认配置如下,在 Global:
inference_model_dir: "/home/work/PretrainedModel/"
batch_size: 1
use_gpu: True
enable_mkldnn: True
cpu_num_threads: 10
enable_benchmark: True
use_fp16: False
ir_optim: True
use_tensorrt: False
gpu_mem: 8000
enable_profile: FalsePreProcess:
transform_ops:
- ResizeImage:
resize_short: 256
- CropImage:
size: 224
- NormalizeImage:
scale: 0.00392157
mean: [0.485, 0.456, 0.406]
std: [0.229, 0.224, 0.225]
order: ''
channel_num: 3
- ToCHWImage:在此步骤后
6、生成模型版本。 Notebook中的模型文件只有生成模型版本后,才可以执行发布和部署功能:
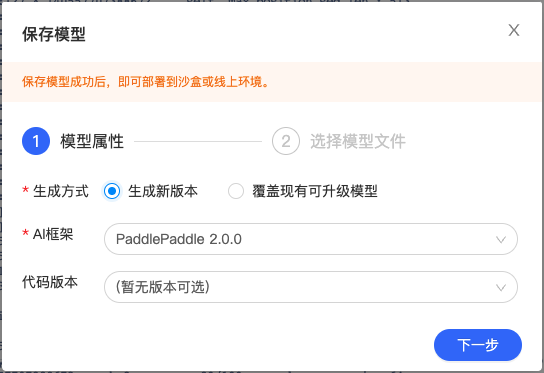
点击左侧导航栏中的生成模型版本组件,打开弹窗填写信息。
模型属性-选择 AI 框架选择 PaddlePaddle2.0.0,若上一次操作中进行了代码保存,可在“代码版本”选择对应的代码版本。
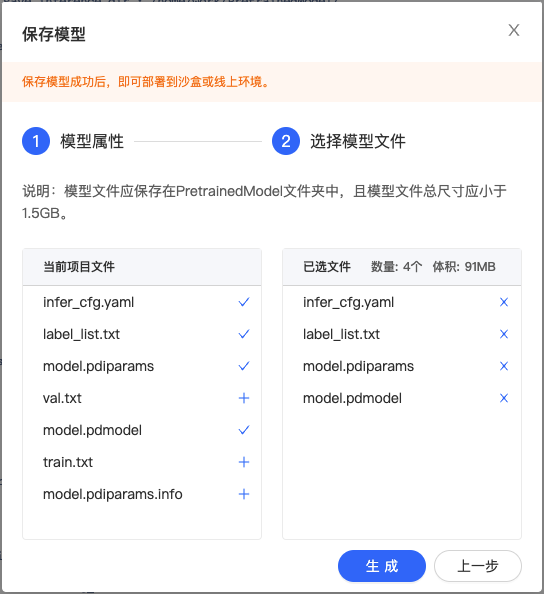
选择模型文件-选择
点击『生成』即可生成模型版本,生成模型版本一般需要数十秒,请耐心等待。 配置并发布模型BML NoteBook 的图像分类单标签模板产出的模型支持进行部署,下面以 PaddleClas 的模型为例,详细介绍如何配置模型: 1、查看前置条件是否满足:需要训练完成,并生成了相应的模型生成版本(详见训练模型的第六步)。 2、回到 BML Notebook 列表页,点击『模型发布列表』即可进入配置页面。
3、点击配置,即可进入配置流程。
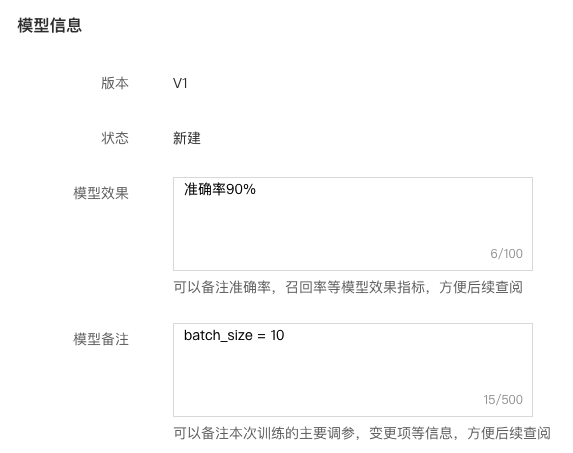
4、填写模型信息。
5、选择待发布的模型文件,点击确定按钮。
其中:
6、配置出入参及数据逻辑处理。 这部分配置主要实现自定义的模型预处理和后处理逻辑。该脚本用于将选择的模型文件发布成模型服务。用户可以通过修改 实现脚本有一些建议和限制:
配置出入参及数据处理逻辑脚本:实现图片的预处理和模型输出结果后处理的逻辑; 这一步是比较关键,但也比较复杂的一步。上面介绍了脚本实现时的限制和建议。这里针对
注: - 可以看下平台预置代码文件,以及各个类及函数的注释了解实现细节。这里贴了`PaddleClass套件`对应的脚本文件,整个代码比较长,但大部分内容都拷贝于[PaddleClas套件的推理示例](https://github.com/PaddlePaddle/PaddleClas/blob/develop/deploy/python/predict_cls.py)。如果自身训练模型比较特殊,当前脚本支持不了,需要自己去PaddleClas套件中寻找逻辑,并更新到该脚本中。
- 对于处理脚本里面的预处理`preprocess`方法,第一个返回参数`input_info`为字典类型,其中字典的key 为模型的输入节点名称,需要根据模型修改。

如果不知道训练模型的输入节点名称是什么,可以先用下面提供的脚本进行一次模型验证,验证日志里面查看对应的输入名称。


#!/usr/bin/env python# -*- coding: utf-8 -*-# *******************************************************************************## Copyright (c) 2020 Baidu.com, Inc. All Rights Reserved## *******************************************************************************# 注意事项:# 该脚本用于将通过notebook训练产出的模型发布成模型服务# 用户可以通过修改PredictWrapper的preprocess和postprocess方法来实现自定义的请求预处理和预测结果后处理# 当在EasyDL提交该脚本时,系统会根据用户选择的模型文件和脚本内容,来验证是否可以启动模型服务,如果验证通过,即可进行模型效果校验以及部署模型服务# 下面是修改脚本的一些限制和建议:# 1. CustomException必须存在且是异常类;在自定义的逻辑中,建议当处理进入错误的分支时,抛出CustomException并指定message,指定的message在请求回包中会作为error_msg返回;# 2. PredictWrapper类必须存在,且必需包含preprocess和postprocess两个方法;# 3. PredictWrapper的preprocess和postprocess方法,是用户自定义模型服务请求预处理和预测结果后处理的入口;# 4. preprocess方法接收的第一个参数为用户请求的json字典,对于图像类服务,传入图像的参数key必须是"image",且传入的是图片的base64编码# 5. 系统会根据postprocess方法的返回结果`result`类型的不同,做以下处理:#       dict: 不作修改#       list: 转换为 {"results": result}#       其他: 转换为 {"result": result}#    处理结果将转换为json字符串,以确保系统能正常将结果作为请求回包返回。import base64import mathimport randomimport cv2import loggingimport numpy as npimport siximport yamlfrom functools import partialfrom PIL import Image

DEFAULT_TOP_NUM = 6class CustomException(RuntimeError):
    """
    进行模型验证和部署服务必需的异常类,缺少该类在代码验证时将会失败
    在处理异常数据或者请求时,推荐在`PredictWrapper`中的自定义预处理preprocess和后处理postprocess函数中抛出`CustomException`类,
    并为`message`指定准确可读的错误信息,以便在服务响应包中的`error_msg`参数中返回。
    """
    def __init__(self, message, orig_error=None):
        """ 根据`message`初始化 """
        super(CustomException, self).__init__(message)
        self.orig_error = orig_errorclass PredictWrapper(object):
    """ 模型服务预测封装类,支持用户自定义对服务请求数据的预处理和模型预测结果的后处理函数 """

    def __init__(self, model_path):
        """
        根据`model_path`初始化`PredictWrapper`类,如解析label_list.txt,加载模型输出标签id和标签名称的映射关系
        :param model_path: 该目录下存放了用户选择的模型版本中包含的所有文件
        """
        # 加载推理配置文件,获取【预处理配置】及【标签id和名称的映射关系】
        ops_config = [
            {"ResizeImage": {"resize_short": 256}},
            {"CropImage": {"size": 224}},
            {"NormalizeImage": {"scale": 0.00392157, "mean": [0.485, 0.456, 0.406],
                                "std": [0.229, 0.224, 0.225], "order": '', "channel_num": 3}},
            {"ToCHWImage": {}},
        ]
        conf_path = '{model_path}/{conf_file}'.format(model_path=model_path, conf_file='infer_cfg.yml')
        try:
            with open(conf_path) as conf_fin:
                infer_conf = yaml.load(conf_fin, Loader=yaml.FullLoader)
                if "PreProcess" in infer_conf and "transform_ops" in infer_conf["PreProcess"]:
                    ops_config = infer_conf["PreProcess"]["transform_ops"]
        except:
            pass

        self._preprocess_ops = create_operators(ops_config)

        try:
            label_path = '{model_path}/{label_file}'.format(model_path=model_path, label_file='label_list.txt')
            self._label_list = {}
            with open(label_path) as label_list_f:
                for index, line in enumerate(label_list_f):
                    line = line.strip()
                    label_info = line.split(":", 1)
                    if len(label_info) == 2:
                        self._label_list[int(label_info[0])] = label_info[1]
                    else:
                        self._label_list[index] = line        except:
            pass

    def preprocess(self, request_body, **preprocess_args):
        """
        自定义对请求体的预处理,针对图像类模型服务,包括对图片对图像的解析、转化等
        :param request_body: 请求体的json字典
        :param preprocess_args: 从`{model_path}/preprocess_args.json`中加载的预处理参数字典,json文件不存在时,传入为空字典
        :return:
            data: 用于模型预测的输入。注意:data结构为dict,key为模型输入节点的名称,value为对应需要喂入的值,batch只能为1
            infer_args: 用于模型预测的其他参数
            request_context: 透传给自定义后处理函数`postprocess`的参数,例如指定返回预测结果的top N,过滤低score的阈值threshold.
        """
        # decode image from base64 string in request
        try:
            image_b64 = request_body['image']
            img_bin = base64.b64decode(image_b64)
        except KeyError:
            raise CustomException('Missing required parameter')
        except Exception:
            raise CustomException('Invalid BASE64')

        data = np.frombuffer(img_bin, dtype='uint8')
        im = cv2.imdecode(data, 1)  # BGR mode, but need RGB mode
        im = cv2.cvtColor(im, cv2.COLOR_BGR2RGB)

        # paddle cls
        # code: https://github.com/PaddlePaddle/PaddleClas/blob/develop/deploy/python/predict_cls.py
        try:
            for preprocess_op in self._preprocess_ops:
                im = preprocess_op(im)

            input_info = {"x": im[np.newaxis, ...]}
        except Exception:
            raise CustomException('Failed decoding input')

        return input_info, {}, {"top_num": request_body.get("top_num", DEFAULT_TOP_NUM)}

    def postprocess(self, infer_result, request_context, **postprocess_args):
        """
        自定义对图像分类模型输出结果的后处理,例如根据score对label进行排序,获取top N分类结果等
        :param infer_result: fluid模型的预测结果
        :param request_context: 自定义预处理函数中返回的`request context`
        :param postprocess_args: 从`{model_path}/postprocess_args.json`中加载的后处理参数字典,json文件不存在时,传入为空字典
        :return: request results 请求的处理结果
        """
        top_num = request_context["top_num"]
        result = infer_result[0]
        result = get_result_list(result)

        indices = np.flip(np.argsort(result), 0)[:top_num]
        top_results = list()
        for item in indices:
            item = int(item)
            top_results.append({
                'score': float(result[item]),
                'name': self._label_list.get(item, str(item))
            })
        return top_resultsdef create_operators(params):
    """
    create operators based on the config
    Args:
        params(list): a dict list, used to create some operators
    """
    assert isinstance(params, list), ('operator config should be a list')
    op_mapping = {
        "UnifiedResize": UnifiedResize,
        "DecodeImage": DecodeImage,
        "ResizeImage": ResizeImage,
        "CropImage": CropImage,
        "RandCropImage": RandCropImage,
        "RandFlipImage": RandFlipImage,
        "NormalizeImage": NormalizeImage,
        "ToCHWImage": ToCHWImage,
    }
    ops = []
    for operator in params:
        assert isinstance(operator,
                          dict) and len(operator) == 1, "yaml format error"
        op_name = list(operator)[0]
        param = {} if operator[op_name] is None else operator[op_name]
        op = op_mapping[op_name](**param)
        ops.append(op)

    return opsclass UnifiedResize(object):
    def __init__(self, interpolation=None, backend="cv2"):
        _cv2_interp_from_str = {
            'nearest': cv2.INTER_NEAREST,
            'bilinear': cv2.INTER_LINEAR,
            'area': cv2.INTER_AREA,
            'bicubic': cv2.INTER_CUBIC,
            'lanczos': cv2.INTER_LANCZOS4        }
        _pil_interp_from_str = {
            'nearest': Image.NEAREST,
            'bilinear': Image.BILINEAR,
            'bicubic': Image.BICUBIC,
            'box': Image.BOX,
            'lanczos': Image.LANCZOS,
            'hamming': Image.HAMMING        }

        def _pil_resize(src, size, resample):
            pil_img = Image.fromarray(src)
            pil_img = pil_img.resize(size, resample)
            return np.asarray(pil_img)

        if backend.lower() == "cv2":
            if isinstance(interpolation, str):
                interpolation = _cv2_interp_from_str[interpolation.lower()]
            # compatible with opencv < version 4.4.0
            elif interpolation is None:
                interpolation = cv2.INTER_LINEAR
            self.resize_func = partial(cv2.resize, interpolation=interpolation)
        elif backend.lower() == "pil":
            if isinstance(interpolation, str):
                interpolation = _pil_interp_from_str[interpolation.lower()]
            self.resize_func = partial(_pil_resize, resample=interpolation)
        else:
            logging.warning(
                "The backend of Resize only support \"cv2\" or \"PIL\". \"%s\" is unavailable. Use \"cv2\" instead.",
                backend            )
            self.resize_func = cv2.resize    def __call__(self, src, size):
        return self.resize_func(src, size)class OperatorParamError(ValueError):
    """ OperatorParamError
    """
    passclass DecodeImage(object):
    """ decode image """

    def __init__(self, to_rgb=True, to_np=False, channel_first=False):
        self.to_rgb = to_rgb
        self.to_np = to_np  # to numpy
        self.channel_first = channel_first  # only enabled when to_np is True

    def __call__(self, img):
        if six.PY2:
            assert type(img) is str and len(
                img) > 0, "invalid input 'img' in DecodeImage"
        else:
            assert type(img) is bytes and len(
                img) > 0, "invalid input 'img' in DecodeImage"
        data = np.frombuffer(img, dtype='uint8')
        img = cv2.imdecode(data, 1)
        if self.to_rgb:
            assert img.shape[2] == 3, 'invalid shape of image[%s]' % (
                img.shape)
            img = img[:, :, ::-1]

        if self.channel_first:
            img = img.transpose((2, 0, 1))

        return imgclass ResizeImage(object):
    """ resize image """

    def __init__(self,
                 size=None,
                 resize_short=None,
                 interpolation=None,
                 backend="cv2"):
        if resize_short is not None and resize_short > 0:
            self.resize_short = resize_short
            self.w = None
            self.h = None
        elif size is not None:
            self.resize_short = None
            self.w = size if type(size) is int else size[0]
            self.h = size if type(size) is int else size[1]
        else:
            raise OperatorParamError("invalid params for ReisizeImage for '\                'both 'size' and 'resize_short' are None")

        self._resize_func = UnifiedResize(
            interpolation=interpolation, backend=backend)

    def __call__(self, img):
        img_h, img_w = img.shape[:2]
        if self.resize_short is not None:
            percent = float(self.resize_short) / min(img_w, img_h)
            w = int(round(img_w * percent))
            h = int(round(img_h * percent))
        else:
            w = self.w
            h = self.h        return self._resize_func(img, (w, h))class CropImage(object):
    """ crop image """

    def __init__(self, size):
        if type(size) is int:
            self.size = (size, size)
        else:
            self.size = size  # (h, w)

    def __call__(self, img):
        w, h = self.size
        img_h, img_w = img.shape[:2]

        if img_h < h or img_w < w:
            raise Exception(
                "The size({h}, {w}) of CropImage must be greater than size({img_h}, {img_w}) of image. "
                "Please check image original size and size of ResizeImage if used.".format(h=h, w=w, img_w=img_w,
                                                                                           img_h=img_h)
            )

        w_start = (img_w - w) // 2
        h_start = (img_h - h) // 2

        w_end = w_start + w
        h_end = h_start + h        return img[h_start:h_end, w_start:w_end, :]class RandCropImage(object):
    """ random crop image """

    def __init__(self,
                 size,
                 scale=None,
                 ratio=None,
                 interpolation=None,
                 backend="cv2"):
        if type(size) is int:
            self.size = (size, size)  # (h, w)
        else:
            self.size = size

        self.scale = [0.08, 1.0] if scale is None else scale
        self.ratio = [3. / 4., 4. / 3.] if ratio is None else ratio

        self._resize_func = UnifiedResize(
            interpolation=interpolation, backend=backend)

    def __call__(self, img):
        size = self.size
        scale = self.scale
        ratio = self.ratio

        aspect_ratio = math.sqrt(random.uniform(*ratio))
        w = 1. * aspect_ratio
        h = 1. / aspect_ratio

        img_h, img_w = img.shape[:2]

        bound = min((float(img_w) / img_h) / (w**2),
                    (float(img_h) / img_w) / (h**2))
        scale_max = min(scale[1], bound)
        scale_min = min(scale[0], bound)

        target_area = img_w * img_h * random.uniform(scale_min, scale_max)
        target_size = math.sqrt(target_area)
        w = int(target_size * w)
        h = int(target_size * h)

        i = random.randint(0, img_w - w)
        j = random.randint(0, img_h - h)

        img = img[j:j + h, i:i + w, :]

        return self._resize_func(img, size)class RandFlipImage(object):
    """ random flip image
        flip_code:
            1: Flipped Horizontally
            0: Flipped Vertically
            -1: Flipped Horizontally & Vertically
    """

    def __init__(self, flip_code=1):
        assert flip_code in [-1, 0, 1
                             ], "flip_code should be a value in [-1, 0, 1]"
        self.flip_code = flip_code    def __call__(self, img):
        if random.randint(0, 1) == 1:
            return cv2.flip(img, self.flip_code)
        else:
            return imgclass NormalizeImage(object):
    """ normalize image such as substract mean, divide std
    """

    def __init__(self,
                 scale=None,
                 mean=None,
                 std=None,
                 order='chw',
                 output_fp16=False,
                 channel_num=3):
        if isinstance(scale, str):
            scale = eval(scale)
        assert channel_num in [
            3, 4
        ], "channel number of input image should be set to 3 or 4."
        self.channel_num = channel_num
        self.output_dtype = 'float16' if output_fp16 else 'float32'
        self.scale = np.float32(scale if scale is not None else 1.0 / 255.0)
        self.order = order
        mean = mean if mean is not None else [0.485, 0.456, 0.406]
        std = std if std is not None else [0.229, 0.224, 0.225]

        shape = (3, 1, 1) if self.order == 'chw' else (1, 1, 3)
        self.mean = np.array(mean).reshape(shape).astype('float32')
        self.std = np.array(std).reshape(shape).astype('float32')

    def __call__(self, img):
        from PIL import Image        if isinstance(img, Image.Image):
            img = np.array(img)

        assert isinstance(img,
                          np.ndarray), "invalid input 'img' in NormalizeImage"

        img = (img.astype('float32') * self.scale - self.mean) / self.std        if self.channel_num == 4:
            img_h = img.shape[1] if self.order == 'chw' else img.shape[0]
            img_w = img.shape[2] if self.order == 'chw' else img.shape[1]
            pad_zeros = np.zeros(
                (1, img_h, img_w)) if self.order == 'chw' else np.zeros(
                    (img_h, img_w, 1))
            img = (np.concatenate(
                (img, pad_zeros), axis=0)
                   if self.order == 'chw' else np.concatenate(
                       (img, pad_zeros), axis=2))
        return img.astype(self.output_dtype)class ToCHWImage(object):
    """ convert hwc image to chw image
    """

    def __init__(self):
        pass

    def __call__(self, img):
        from PIL import Image        if isinstance(img, Image.Image):
            img = np.array(img)

        return img.transpose((2, 0, 1))def get_result_list(results):
    """ 判断模型输出结果的shape,并返回一维的soft-maxed 数组"""
    shape = np.array(results).shape
    max_val = max(shape)
    max_dim = shape.index(max_val)
    ret = results    for i in range(max_dim):
        ret = ret[0]
    result_arr = []
    for item in ret:
        real_item = item        for i in range(max_dim + 1, len(shape)):
            real_item = real_item[0]
        result_arr.append(real_item)
    return np.array(result_arr)
7、点击提交即可进入模型验证阶段,验证时间一般需要数十秒,请耐心等待。
验证通过后,显示有效。
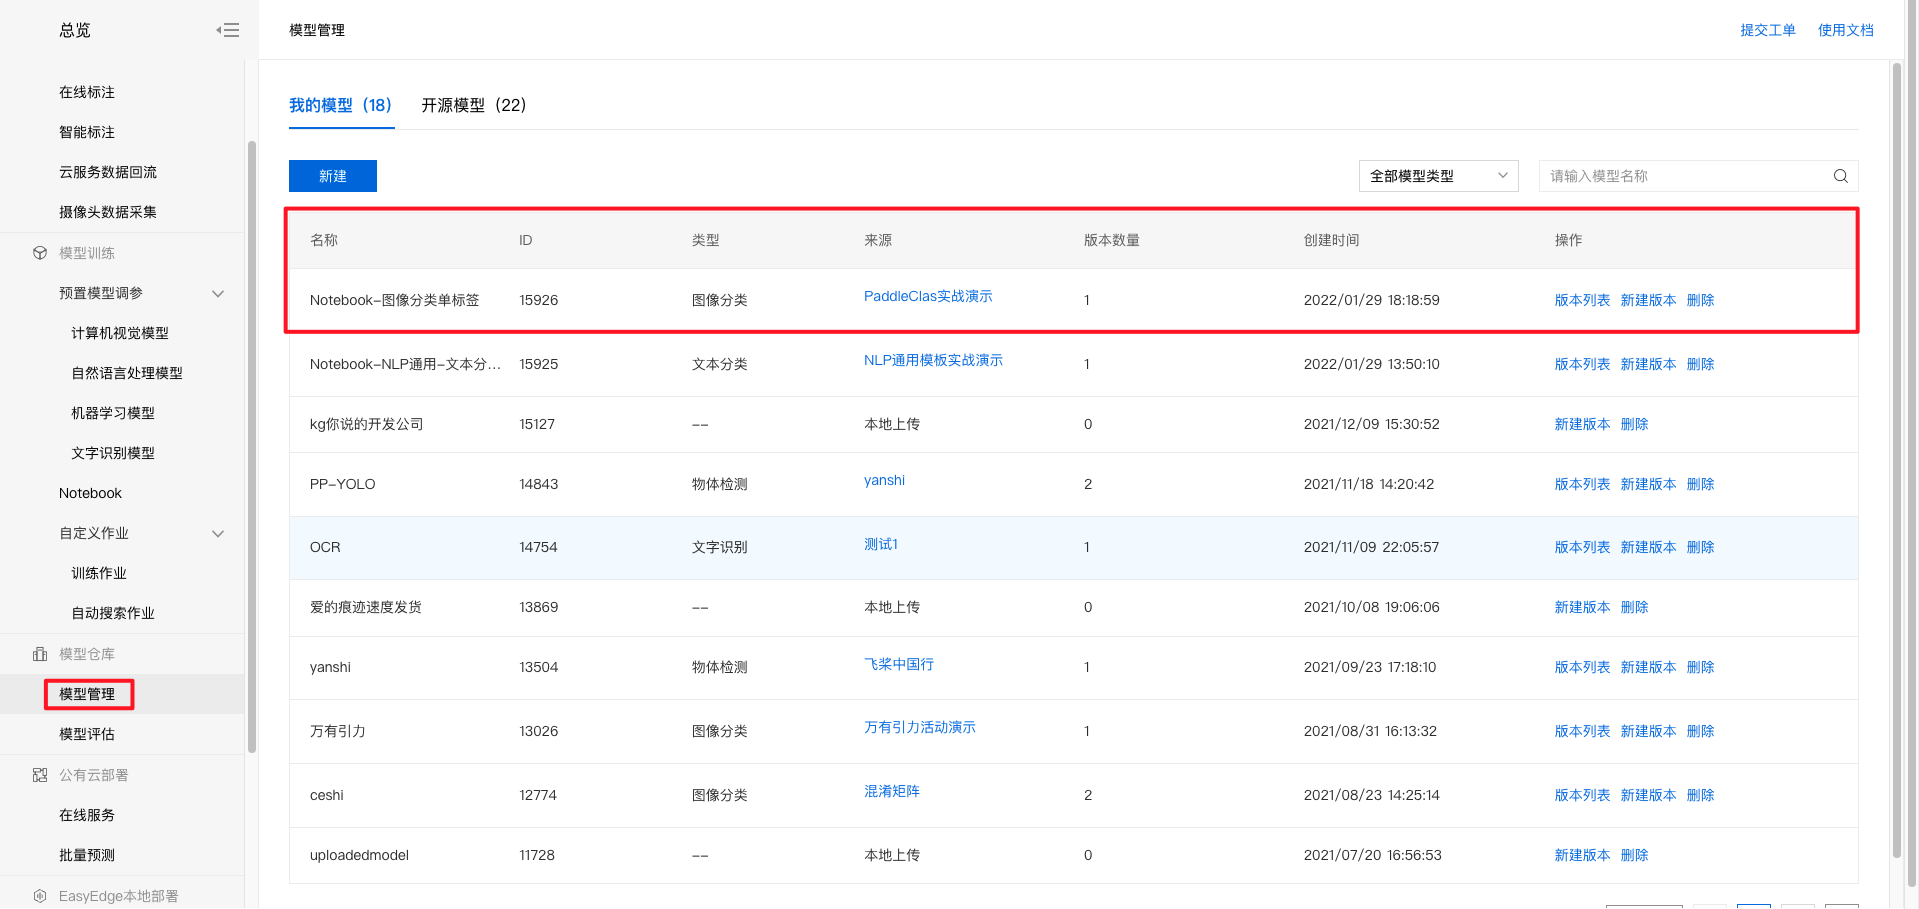
8、点击发布,填写相关信息后,即可发布成功。 9、点击左侧导航栏模型管理,即可查看发布成功的模型。
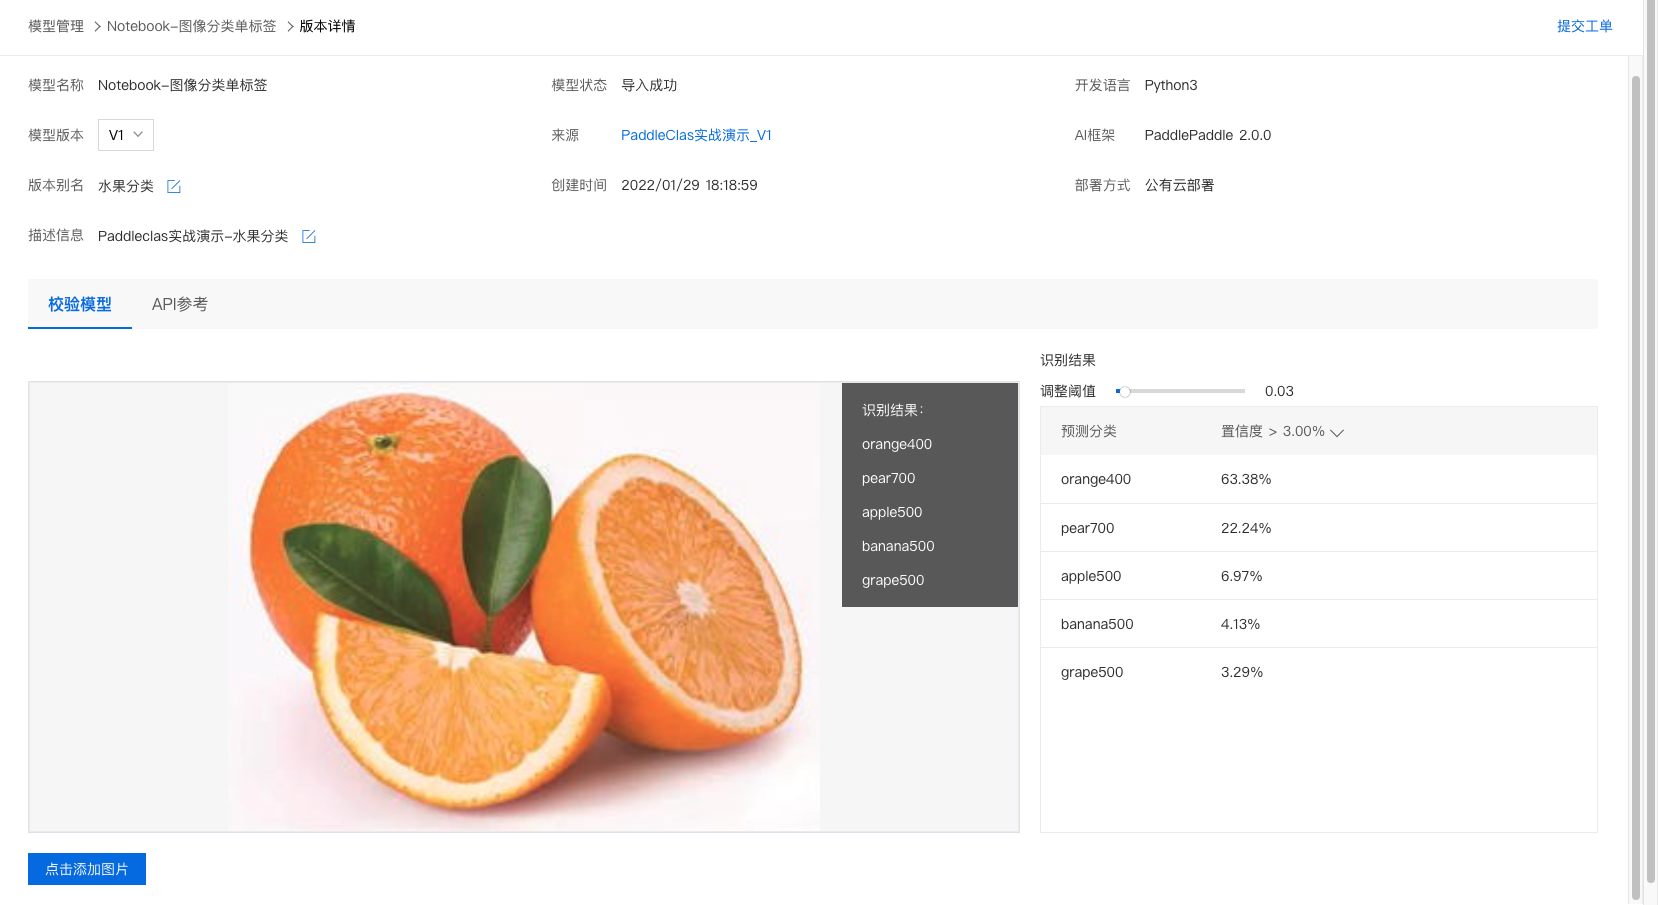
校验模型1、点击『版本列表』。
2、点击『校验模型』。
3、点击『启动模型校验』,启动约需5分钟,请耐心等待。
4、上传图像即可开始校验,示例如下:
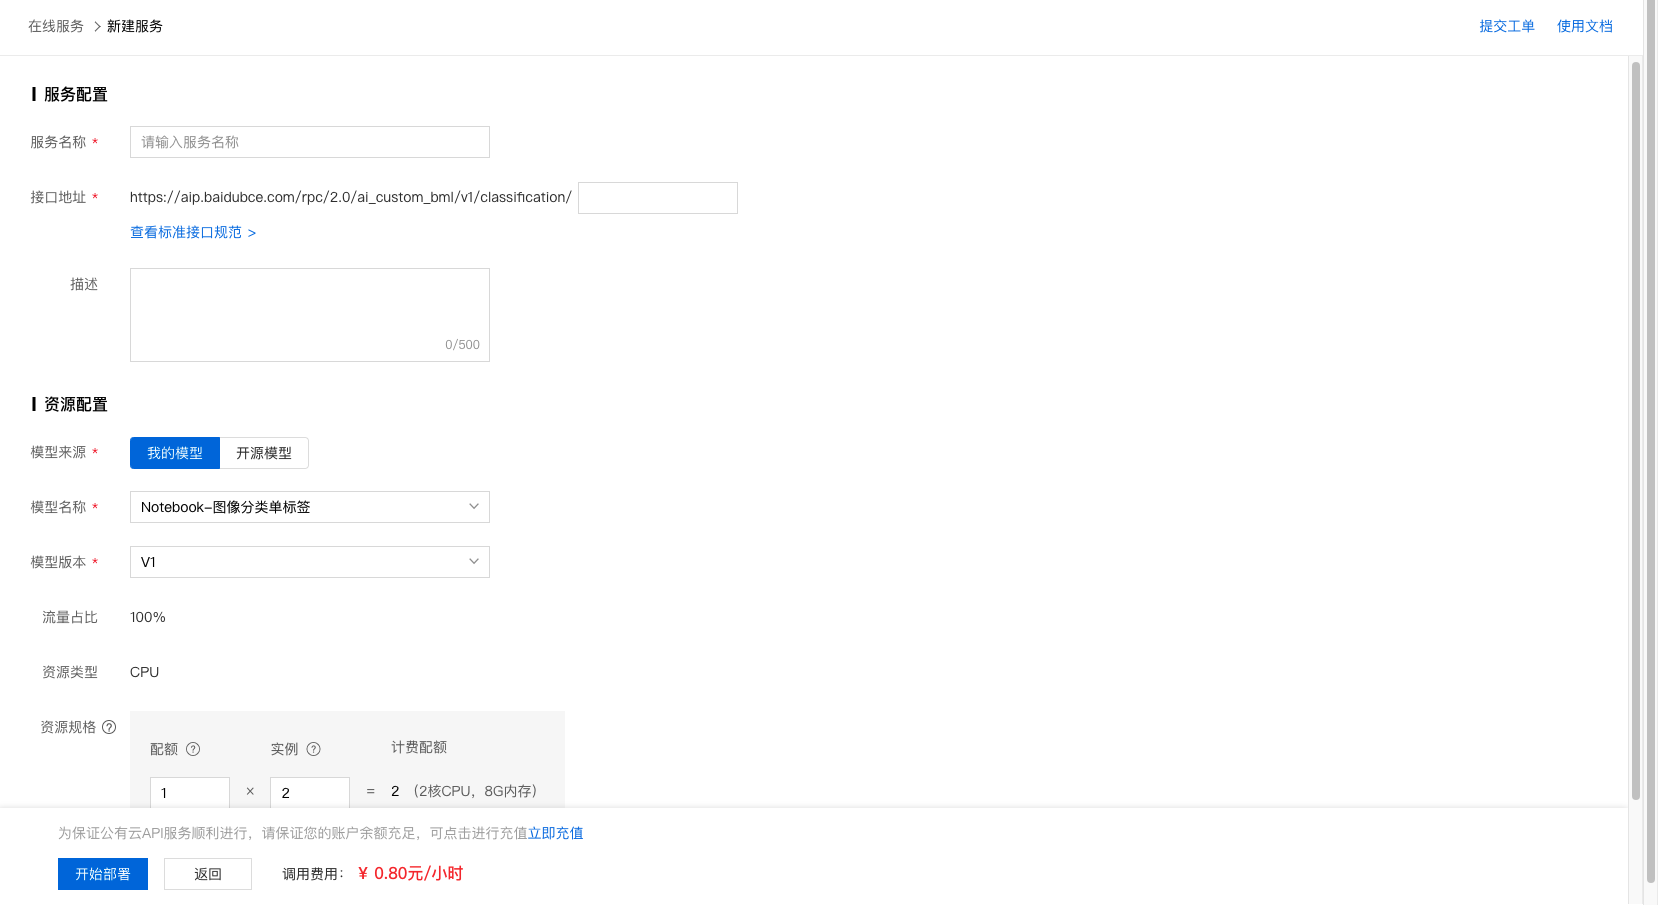
部署在线服务1、点击『版本列表』。
2、点击部署-在线服务。
3、完成信息填写及资源规格选择后,即可开始部署。
4、部署过程需要数十秒时间,请耐心等待。部署完成后,示例如下:
5、API调用方法请参考 公有云部署管理。 |
233
新用户注册立享888元代金券大礼包!
免费注册
- 100倍故障赔偿
- 3天无理由退款
- 7x24小时服务
- 0元快速备案
- 1V1专席秘书
Copyright © 2023 版权所有:湖南尊托云数科技有限公司  工信部ICP备案号:湘ICP备2022009064号-1
  湘公网安备 43019002001723号
  统一社会信用代码:91430100MA7AWBEL41 本站为小鸟云代理商:
 《增值电信业务经营许可证》B1-20160477


